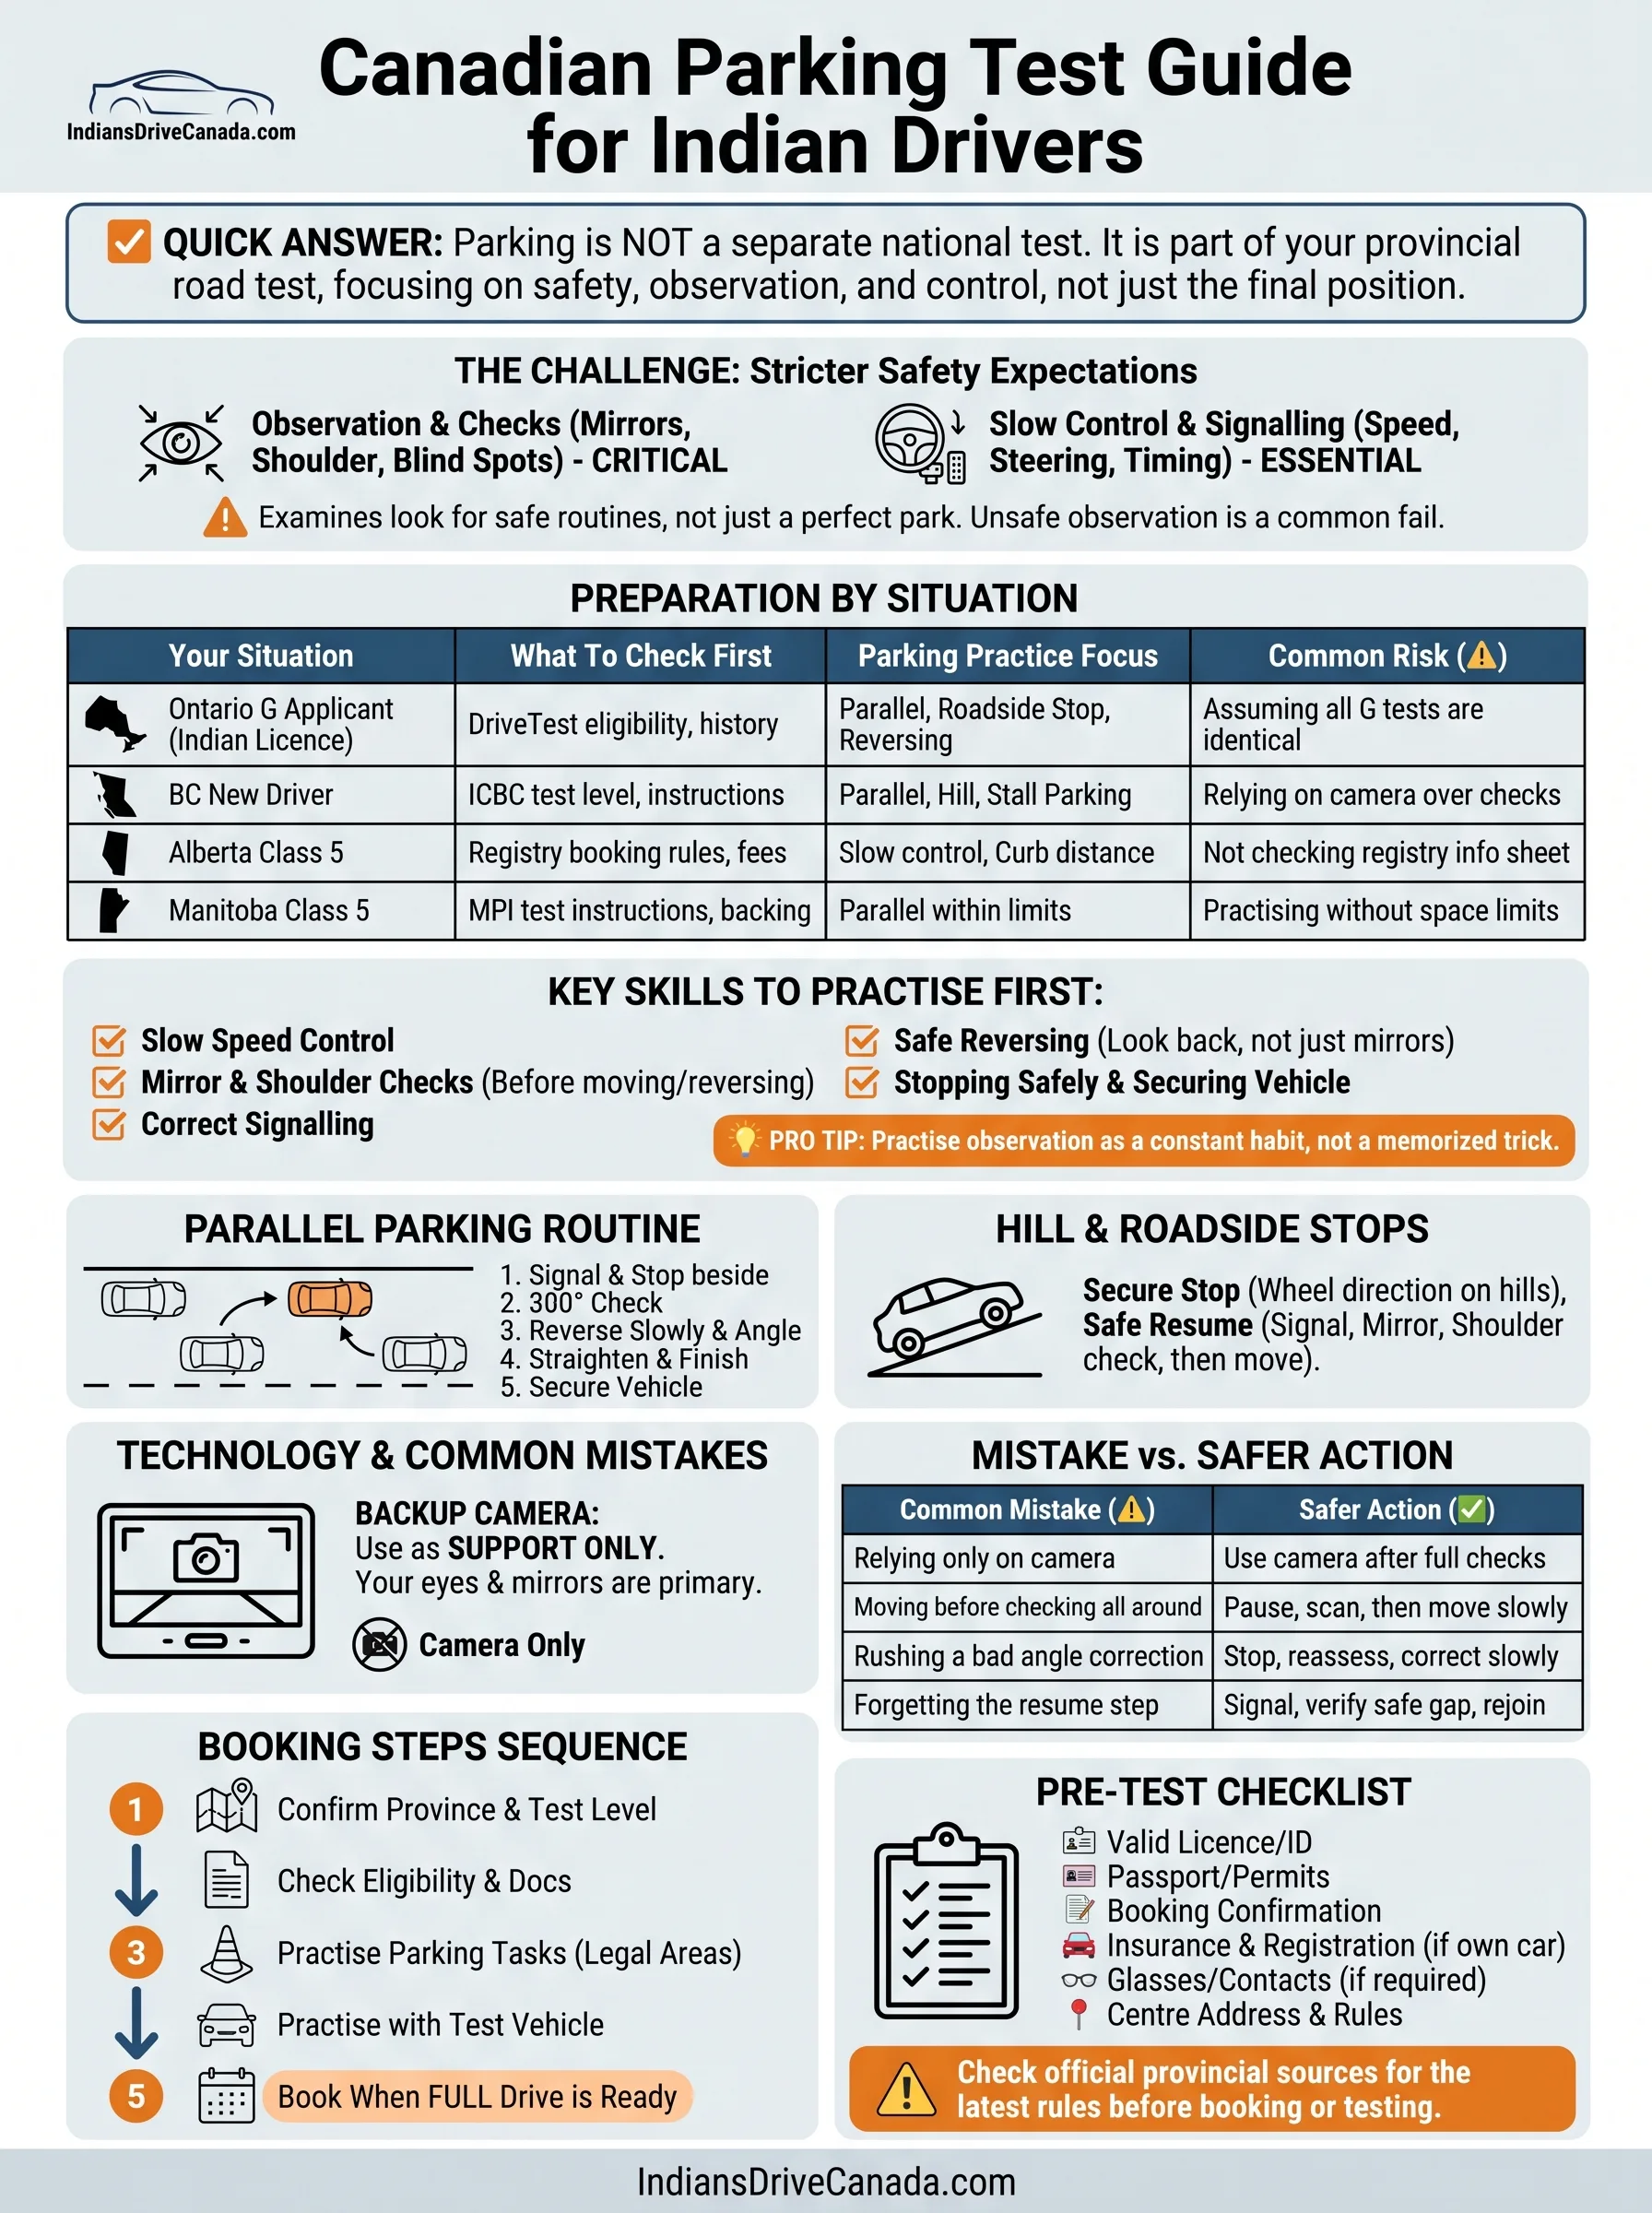
Canada does not use one national parking-test script. The manoeuvres you may be asked to perform depend on the province, licence class and road-test stage shown on your booking.
For a driver accustomed to India’s left-side traffic, the main adjustment is not simply turning the steering wheel in the opposite direction. It is learning to judge the right curb from a left-hand driver’s seat, checking the correct blind areas and completing every parking move at a controlled speed.
Your province decides what parking means on the test
Do not prepare from a video that only says “Canadian driving test.” Ontario, British Columbia, Manitoba and Saskatchewan do not describe parking assessment in the same way. A manoeuvre that is central to one test may be absent from another test stage.
| Province | What the official material says | What to practise |
|---|---|---|
| Ontario |
Ontario states that its current G road test does not include parallel parking, roadside stops or a three-point turn because those elements are covered at the G2 stage. [Ontario test scope] |
Confirm whether the booking is for the G2 or G test. Do not use the current G-test omission to assume parallel parking is irrelevant to G2 preparation. |
| British Columbia |
ICBC advises candidates that a road test may include vehicle-handling and parking manoeuvres such as parallel parking and hill parking. Its road-test preparation material also discusses reverse-stall parking. [BC road test] |
Practise parallel parking, hill parking, reverse-stall parking and the observation routine used before reversing. |
| Manitoba |
A Manitoba Class 5 road test is discontinued if the driver fails the parallel-parking exercise. MPI says the exercise is performed at the beginning whenever possible. [Manitoba test rule] |
Treat parallel parking as a separate test component, not a minor positioning exercise that can be ignored after general road practice. |
| Saskatchewan |
SGI lists backing up, parallel parking and two-point turns among the abilities assessed during the road test. [Saskatchewan test] |
Practise reversing observation, parallel parking, two-point turns, shoulder checks and safe steering at low speed. |
| Nova Scotia |
The provincial handbook describes assessment of vehicle control during starting, stopping, turning and parking, together with mirror use, shoulder checks and general observation. [Assessment criteria] |
Practise the full safety sequence, not only the final position of the vehicle. |
| Other provinces and territories | The absence of a province from this table does not mean parking will be absent from its test. | Check the local passenger-vehicle handbook and road-test appointment instructions for the exact licence class being tested. |
Do not transfer one province’s rule to another. Ontario’s current G-test format does not create a Canada-wide exemption from parallel parking. Manitoba’s automatic test-ending rule also does not describe how every other province scores the same manoeuvre.
Reset the habits that change when traffic moves on the right
India generally uses left-side traffic with the driver seated on the right side of the vehicle. Canadian passenger vehicles generally place the driver on the left and traffic moves on the right.
An experienced driver can therefore understand vehicle control while still needing time to rebuild distance judgement and observation order. This is a habit transfer issue, not a lack of driving experience.
| Driving task | Adjustment in a Canadian vehicle | Useful practice method |
|---|---|---|
| Judging the curb | The right curb is farther from the driver’s seat and may appear closer than it really is. | Stop at several measured curb distances and compare the actual gap with what appears in the right mirror. |
| Watching the front corner | The front-left corner may swing into the traffic lane while the rear of the vehicle moves toward the right curb. | Use cones to mark the outer path of the front bumper during slow reversing. |
| Checking the blind area | The direction and timing of the shoulder check may not match an established left-traffic habit. | Practise saying “mirror, signal, shoulder, move” before leaving a parked position. |
| Leaving the space | Traffic beside a right-side parking space is on the driver’s left. | Repeat the complete left mirror and left shoulder check before moving into the lane. |
| Understanding commands | Right and left instructions may take longer to process when the driver is also reversing established traffic-side habits. | Use short English commands during mock tests without translating each word mentally. |
Practise in the vehicle expected to be used for the road test. Moving from a compact hatchback to a long sedan, SUV or minivan changes the rear-wheel path, front-end swing and useful mirror references.
The examiner assesses more than the final parking position
A vehicle can finish parallel to the curb while the manoeuvre still contains unsafe observation, speed or signalling errors. The examiner watches the process before, during and after the parking movement.
Observation before the vehicle moves
The first assessment begins before reversing. The driver should know whether a pedestrian, cyclist, vehicle, post, shopping cart or other obstruction is beside or behind the vehicle.
ICBC specifically advises drivers to complete a 360-degree check before parallel and reverse-stall parking.
[Observation check]
A useful 360-degree check is a deliberate scan of the surrounding area. It should not become a quick head movement performed only to make the examiner notice it.
Communication with other road users
Signal before pulling toward the curb or entering a stall. Brake early enough for the following driver to understand that the vehicle is slowing. If traffic, a cyclist or a pedestrian enters the intended path, stop and wait rather than trying to complete the manoeuvre before they arrive.
Low-speed vehicle control
Parking should be completed slowly enough that the vehicle can be stopped immediately. In an automatic vehicle, this normally means allowing idle movement while controlling speed with the brake instead of alternating between strong acceleration and abrupt braking.
The examiner can observe:
Safe completion and departure
The manoeuvre is not finished when the vehicle stops. The driver may need to straighten the wheels, select the correct gear, apply the parking brake and demonstrate the correct procedure for returning to traffic.
Leaving the space without a signal or shoulder check can create a more serious safety problem than a small positioning correction made during parking.
A repeatable safety sequence before every parking move
1. Slow before reaching the space
Reduce speed early. Avoid passing the space and then stopping suddenly while another vehicle is close behind.
2. Signal the intended movement
Signal before moving toward the curb or stall. The signal communicates intention; it does not give the driver priority over pedestrians, cyclists or passing traffic.
3. Scan the complete path
Check the mirrors, blind areas, rear path, side clearances and front-end swing area. Repeat the scan if the vehicle has been stationary long enough for the surroundings to change.
4. Establish the starting position
Begin from a position that leaves enough room for the vehicle’s size and turning circle. Poor setup usually forces a sharper steering correction later.
5. Move at a speed that allows an immediate stop
Continue scanning while the vehicle moves. Do not stare at one mirror, one reference point or the rear-view camera.
6. Secure the vehicle and prepare to leave safely
Finish in a legal position, straighten as required, secure the vehicle and complete a new observation sequence before returning to the traffic lane.
Right-side parallel parking without one “magic” reference point
A fixed instruction such as “turn when the mirror reaches the other car’s door” may work in one training vehicle and fail in another. Seat position, mirror adjustment, vehicle length, wheelbase and bumper shape all change what the driver sees.
Use reference points as vehicle-specific clues. The manoeuvre should still be understood as a sequence of rear-wheel movement, front-end clearance and controlled correction.
Choose a space that allows a controlled entry
Ontario’s driver handbook uses a space about one and a half times the vehicle’s length as its parallel-parking example.
[Ontario parking method]
Saskatchewan’s handbook advises checking for at least two metres more than the length of the vehicle when space is uncertain.
[Saskatchewan parking method]
These are handbook practice references, not one national scoring dimension. The actual test setup may use vehicles, poles, curb lines or a defined test area according to the province.
Practice-space worksheet
Measure the test vehicle from front to rear before practising.
- Ontario handbook example: vehicle length × 1.5
- Saskatchewan handbook example: vehicle length + 2 metres
- Example for a 4.5-metre vehicle: 6.75 metres using the Ontario example or 6.5 metres using the Saskatchewan example
Use the formula linked to the province being studied. Do not assume either calculation is the exact space that will be marked at the test location.
Set up parallel to the front vehicle
Approach slowly, signal and stop beside the vehicle ahead of the empty space. Leave enough side clearance to turn without bringing the front corner too close to that vehicle.
A common setup uses the rear bumper of the test vehicle near the rear bumper of the vehicle beside it. The correct visual position still depends on the size and shape of both vehicles.
Before selecting reverse:
- Check the rear-view and side mirrors.
- Check the blind area beside the vehicle.
- Look for pedestrians and cyclists near the curb.
- Check whether another driver is trying to pass.
- Confirm that the intended space does not block a driveway, crosswalk or restricted area.
Move the rear of the vehicle toward the curb
Reverse slowly and steer toward the curb. The rear of the vehicle moves into the space while the front corner moves outward. This outward path is the front-end swing.
Monitor both parts of the vehicle. Looking only at the rear wheel can allow the front bumper to move too far into the traffic lane or too close to the vehicle ahead.
A position near 45 degrees may be a useful visual stage in some methods, but it should not be treated as a required score angle. The real questions are:
Straighten before the rear reaches the curb
As the vehicle enters the space, begin reducing the initial steering angle. Continue reversing slowly while monitoring the curb and rear clearance.
Do not wait until the tire is almost touching the curb before thinking about straightening. The rear wheel continues moving toward the curb even while the steering wheel is being returned.
Counter-steer after the front clears
When the front of the vehicle can move behind the vehicle ahead, steer away from the curb. Continue at low speed so the front enters the space while the rear remains clear of the curb and the vehicle behind.
Do not rotate the steering wheel while allowing the vehicle to roll faster. Steering speed and vehicle speed should be controlled separately.
Centre the vehicle rather than forcing the first attempt
If the vehicle finishes too close to one end of the space or remains at an angle, stop. Check the surroundings again before making a small forward or reverse correction.
A correction should be calm and planned. It should not become a rapid series of forward and reverse movements completed without fresh observation.
Secure the vehicle and show a safe exit
Once positioned:
- Place the transmission in the required parked or secured position.
- Apply the parking brake when required.
- Check that the vehicle is not obstructing traffic.
- Prepare to signal before leaving.
- Check the left mirror and left blind area before moving into the lane.
- Wait for a safe gap rather than expecting approaching traffic to stop.
When a correction is safer than forcing the manoeuvre
A candidate may assume that moving forward means the parking attempt has failed. That belief can cause the driver to continue reversing after the angle, curb distance or front clearance has become unsafe.
| Situation | Controlled response | Risky response |
|---|---|---|
| Too far from the curb | Stop, scan and make a small forward adjustment before reversing again. | Turn sharply and continue reversing without checking the front corner. |
| Entry angle is too steep | Stop before the rear wheel reaches the curb and reassess the available space. | Continue until the tire climbs or strikes the curb. |
| Pedestrian disappears from view | Stop until the pedestrian is seen again and the path is clear. | Assume the person has moved away and continue. |
| Another vehicle approaches | Hold a stable position and allow the situation to become clear. | Accelerate to finish before the vehicle reaches the space. |
| Examiner says “try again” | Stop, confirm the vehicle is secure and begin the permitted correction sequence. | Change direction immediately without mirrors or shoulder checks. |
Manitoba uses a defined parallel-parking exercise. MPI states that drivers have up to three attempts or four minutes, whichever comes first, within its marked test area. The front and rear of the vehicle must finish within 46 centimetres of the curb, and failing the exercise ends the Class 5 road test.
[Parking test format]
The Manitoba format should be practised according to MPI instructions. It should not be presented as the movement limit or curb measurement used across Canada.
Reverse-stall parking requires a moving observation pattern
Reverse-stall parking is not completed safely by aligning the camera guide lines and continuing backward. The driver must monitor the rear path, both side clearances and the front of the vehicle as it swings through the parking aisle.
Begin far enough from the row of parked vehicles
Starting too close to the stalls leaves little room for the front of the vehicle to swing. Longer vehicles and vehicles with a wider turning circle may need a wider starting position.
Check the pedestrian path before reversing
Parking lots contain moving hazards that can appear after the first scan:
Alternate where you look
A practical observation cycle is:
Rear path → right side → left side → front-end swing → rear path
The cycle is not a fixed timing formula. Look more often toward whichever area has the greatest immediate risk.
Use the camera as an extra view
Saskatchewan’s handbook states that a back-up camera does not replace looking over the shoulder and using the mirrors. It also notes that dirt, snow and sunlight can interfere with the camera image.
[Camera limitation]
ICBC similarly advises that a camera does not need to be disabled during the road test, but the driver should not rely on it alone while backing.
[BC camera rule]
Finish centred and ready for a safe departure
Straighten the wheels and position the vehicle between the lines without leaving the front or rear projecting unnecessarily into the aisle. Before driving out, scan for pedestrians and moving vehicles rather than assuming the forward view is clear.
Forward-stall parking is judged by the exit as well as the entry
Driving forward into a stall may feel easier, but a poor approach can place the vehicle over a line or too close to an adjacent vehicle. The return movement may also require reversing through a restricted view.
Do not turn into the stall too early
Turning early can bring the inside front wheel across the adjacent line while the rear remains outside the stall. Move far enough forward for the vehicle to enter near the centre of the space.
Monitor both neighbouring vehicles
Do not focus only on the line nearest the driver. Check the passenger side as the vehicle enters, particularly when driving an unfamiliar SUV or wide sedan.
Prepare for a blocked view when reversing out
A van, pickup or SUV beside the test vehicle may hide approaching traffic. Reverse slowly, pause when the rear begins to clear the neighbouring vehicles and scan again before entering the aisle.
Practise reverse-stall and forward-stall parking in the same session. The two manoeuvres require different setup positions and create different blind areas when leaving.
Hill parking is based on the vehicle’s possible roll path
The wheel direction should be understood through one safety principle: if the parked vehicle begins to roll, its wheels should guide it toward a curb or away from the active roadway rather than into moving traffic.
Saskatchewan’s handbook describes the same principle and requires the emergency brake to be applied when parking on a slope.
[Hill parking]
| Parking condition | Front-wheel position | Intended result if the vehicle rolls |
|---|---|---|
| Downhill with a curb | Turn the wheels toward the curb. | The front tire reaches the curb instead of allowing the vehicle to roll into traffic. |
| Uphill with a curb | Turn the wheels away from the curb. | A backward roll brings the tire toward the curb. |
| Uphill or downhill without a curb | Turn the wheels toward the edge of the road. | The vehicle is directed away from the active roadway. |
Apply the parking brake and secure the transmission. Do not rely only on the wheel angle to hold the vehicle.
If the examiner asks the driver to pull over and park, complete the full parking procedure rather than stopping with the engine running and waiting for the next instruction. ICBC describes this as parking as though the vehicle would be left overnight, although the engine does not need to be switched off during the test.
The parking manoeuvre continues when the vehicle returns to traffic
Many practice sessions end as soon as the vehicle is positioned. A road test may continue immediately, so the departure routine should be practised with the same attention as the entry.
Before moving from the curb
- Prepare the transmission and release the parking brake when safe.
- Signal toward the traffic lane.
- Check the interior and left-side mirrors.
- Complete a left shoulder check.
- Look for cyclists travelling beside parked vehicles.
- Confirm the front of the vehicle can clear the vehicle ahead.
- Wait for a suitable traffic gap.
While entering the lane
Move slowly until the front bumper clears the vehicle ahead. Enter the lane without forcing another road user to brake or change direction. Straighten within the lane and cancel the signal if it has not cancelled automatically.
After leaving a reverse stall
Do not accelerate as soon as the rear bumper clears the parking space. Continue scanning the aisle because pedestrians or another reversing vehicle may enter from either side.
Adjustment errors worth removing before the test
These are possible habit-transfer errors, not characteristics of every driver from India. They can appear whenever an experienced driver changes traffic side, driver position or vehicle size.
| Observed habit | Why it causes difficulty | Replacement action |
|---|---|---|
| Looking in the familiar direction first | The first glance may not cover the most immediate Canadian traffic path. | Use a spoken mirror-and-shoulder-check sequence until the new order becomes automatic. |
| Staying too far from the right curb | The curb may appear closer from the left driver’s seat than it is. | Measure several actual curb gaps and record the matching mirror view. |
| Moving while still checking | The vehicle begins reversing before the full area has been scanned. | Complete the initial check while stopped, then continue active observation during movement. |
| Using only the mirrors | Mirrors do not show every blind area around the vehicle. | Add direct observation and the required shoulder checks. |
| Steering quickly and reversing quickly | The driver has less time to see how each steering change affects the vehicle. | Keep the vehicle slow even when the steering wheel needs to move promptly. |
| Treating curb contact as the only possible error | Unsafe speed, weak observation or interference with traffic can matter more than the final curb gap. | Evaluate the complete manoeuvre from signal to safe departure. |
| Trying to hide a correction | Continuing from a poor angle can create contact or loss of control. | Stop, scan and correct within the rules of the provincial test. |
English commands to understand without delaying the manoeuvre
Examiner wording varies. Saskatchewan states that road tests are conducted in English and that examiners use simple, clear language. Its preparation page asks candidates to understand terms such as shoulder check, two-point turn and parallel park.
[Test language]
Manitoba also publishes examples including “pull over to the right,” “too far from the curb” and “try again.” Its examiners can repeat route directions but cannot coach a driver through the manoeuvre once the test has begun.
| Possible instruction | Plain meaning | Safe response |
|---|---|---|
| Pull over to the right when safe | Choose a legal place and stop beside the right edge. | Check, signal, reduce speed and move toward the curb only when clear. |
| Parallel park behind that vehicle | Use the space behind the vehicle indicated by the examiner. | Assess the space and surrounding traffic before setting up. |
| Back into the stall | Enter the parking space in reverse. | Complete the surrounding check and monitor the front-end swing. |
| Park uphill | Secure the vehicle as though it will remain on an uphill slope. | Position near the edge, set the wheels correctly and apply the parking brake. |
| Resume driving | Leave the parked position and continue on the route. | Signal, check mirrors and blind area, then enter traffic when safe. |
| Too far from the curb | The completed position does not meet the expected curb placement. | Stop and wait for the permitted correction instruction rather than moving suddenly. |
| Try again | Repeat or correct the exercise within the test rules. | Begin with a fresh scan and controlled setup. |
If an instruction is not understood, ask for it to be repeated before beginning a potentially unsafe movement. Asking what direction was requested is different from asking the examiner to teach the parking method.
Build reference points for the vehicle used on test day
Reference points should be calibrated rather than copied blindly. A driving-school sedan, family SUV and rented compact vehicle will not place the curb or neighbouring car in the same part of the mirror.
Record the right-curb mirror view
Park at a safe and legal curb. Measure the distance between the tire and curb, then note where the curb appears in the right mirror. Repeat at several distances.
Identify the rear-wheel turning point
Place a cone beside the rear wheel and reverse slowly while steering. Observe how the rear wheel follows a tighter path than the front bumper.
Mark the front-end swing
Use cones placed well away from traffic to show the outward path of the front corner during parallel and reverse-stall parking.
Learn how to straighten the wheels
Practise returning from full steering lock to straight wheels without looking down at the steering wheel. Confirm by moving slowly forward and checking whether the vehicle tracks straight.
Vehicle reference record
- Vehicle type and approximate length
- Normal driver-seat position
- Right-mirror curb reference
- Rear-wheel entry reference
- Front-bumper clearance reference
- Steering-wheel turns from centre to full lock
- Areas not visible in the rear-view camera
- Location of parking brake, hazard lights, defroster and other controls
Move from empty-space practice to examiner-style practice
Control the vehicle before adding a curb
Begin in a legal practice area with cones. Reverse in a straight line, stop at chosen points and practise steering while maintaining a very low speed.
Use cones to understand vehicle geometry
Set cones beside the rear-wheel path and front-end swing area. The aim is to see how the vehicle moves, not to reproduce the dimensions of a provincial test unless the province publishes them.
Add a real curb only after the sequence is stable
Practise on a quiet street where parking is permitted. Include signalling, observation and safe departure on every attempt.
Mix the manoeuvres
Complete parallel parking, reverse-stall parking, forward-stall parking, roadside stopping and hill parking in an unpredictable order. This prevents the driver from relying on one rehearsed sequence.
Use short examiner-style directions
The accompanying licensed driver should state the task and allow the candidate to make decisions. Continuous steering instructions can create dependence that becomes visible when the examiner is silent.
| Skill | Ready for mock-test conditions when |
|---|---|
| Observation | The driver scans before every reverse or departure movement without being reminded. |
| Speed | The vehicle remains slow enough to stop immediately. |
| Position | The vehicle repeatedly finishes parallel to the curb or centred in the stall. |
| Correction | A poor first angle is corrected calmly without losing observation. |
| Departure | The signal, mirror check and shoulder check occur before leaving. |
| Commands | The driver understands parking instructions without needing a translation during movement. |
Snow and ice change the visual references
Winter practice adds problems that may not exist during dry-weather lessons. The visible edge of a snowbank may not be the actual curb, and packed snow can hide ice, stones or a raised curb face.
A hidden curb can invalidate a familiar mirror reference
Do not assume the snow edge is safe to touch. Leave enough room to avoid climbing onto an unseen curb or pushing the side of the vehicle into a hard snowbank.
Low traction changes the turning path
A vehicle may slide slightly instead of following the expected wheel path. Use gentler braking and steering, and stop the manoeuvre if the vehicle is not responding predictably.
Snow can block cameras and sensors
Clean the camera lens and windows before arriving. A clear image at the start of a journey can become obstructed by road spray or falling snow.
Parking lines may disappear
Where the painted stall lines are partly covered, use visible line sections and neighbouring vehicles cautiously. Do not create a narrow space that prevents another person from entering their vehicle.
Weather does not remove the duty to observe pedestrians, cyclists and other vehicles. If visibility or traction makes a practice area unsafe, postpone the session rather than trying to complete the manoeuvre under unsuitable conditions.
Make sure the test vehicle will be accepted
Parking preparation is wasted if the vehicle cannot pass the pre-test check. Exact rejection rules vary, but provincial testing authorities may inspect basic safety equipment before the road test begins.
Ontario DriveTest states that the examiner performs a basic vehicle check and may ask the driver to operate items such as the turn signals and brake lights.
[Vehicle check]
Saskatchewan lists equipment that must be working, including the horn, signals, brake lights, required headlights, wipers, defroster, seatbelts, speedometer and vehicle doors. It may refuse an unsafe or incorrectly equipped vehicle.
[Test vehicle]
Road-test vehicle check
- Turn signals operate at the front and rear.
- Brake lights operate, including the centre brake light where required.
- Headlights and running lights work.
- The horn works.
- Windshield wipers and washer system work.
- The heater and defroster can keep the windows clear.
- The windshield does not have an obstructing crack or illegal tint.
- Mirrors are secure and correctly adjusted.
- Seatbelts, seats, doors and passenger head restraint are usable.
- Tires are in safe condition.
- No warning condition makes the vehicle unsafe to drive.
- Registration, insurance and other required test documents are available.
- The passenger area is clean and suitable for the examiner.
- The fuel or battery charge is sufficient for the appointment.
Check the vehicle several days before the appointment. A failed bulb, damaged windshield or defroster problem may not be repairable in the test-centre parking lot.
Booking readiness check
A candidate is ready for a full mock test when the following actions can be completed without coaching.
Provincial test scope
- The exact province, licence class and road-test stage are known.
- The current provincial handbook or test page has been checked.
- Ontario G and G2 requirements have not been mixed together.
- Manitoba’s parallel-parking format is understood where applicable.
- Another province’s scoring assumptions are not being used as local rules.
Observation and communication
- The driver signals before approaching the space.
- A complete scan is made before reversing.
- Mirrors, direct observation and shoulder checks are combined.
- The driver stops when a pedestrian or vehicle enters the path.
- A new check is completed before every change of direction.
Vehicle control
- Reversing speed remains low and steady.
- The front-end swing is monitored.
- The driver knows when the wheels are straight.
- A correction can be made without panic.
- The vehicle can be secured correctly on level ground and a hill.
Traffic-side adjustment
- The right curb can be judged from the left driver’s seat.
- The driver does not automatically look in the old traffic-side order.
- Left and right examiner commands are understood immediately.
- The left mirror and left shoulder check are completed before leaving a right-side curb.
Test-day vehicle
- The same vehicle has been used for recent practice.
- The controls can be operated without searching.
- The camera’s blind areas are known.
- The lights, horn, wipers, defroster, tires and windshield have been checked.
- The required provincial documents are ready.