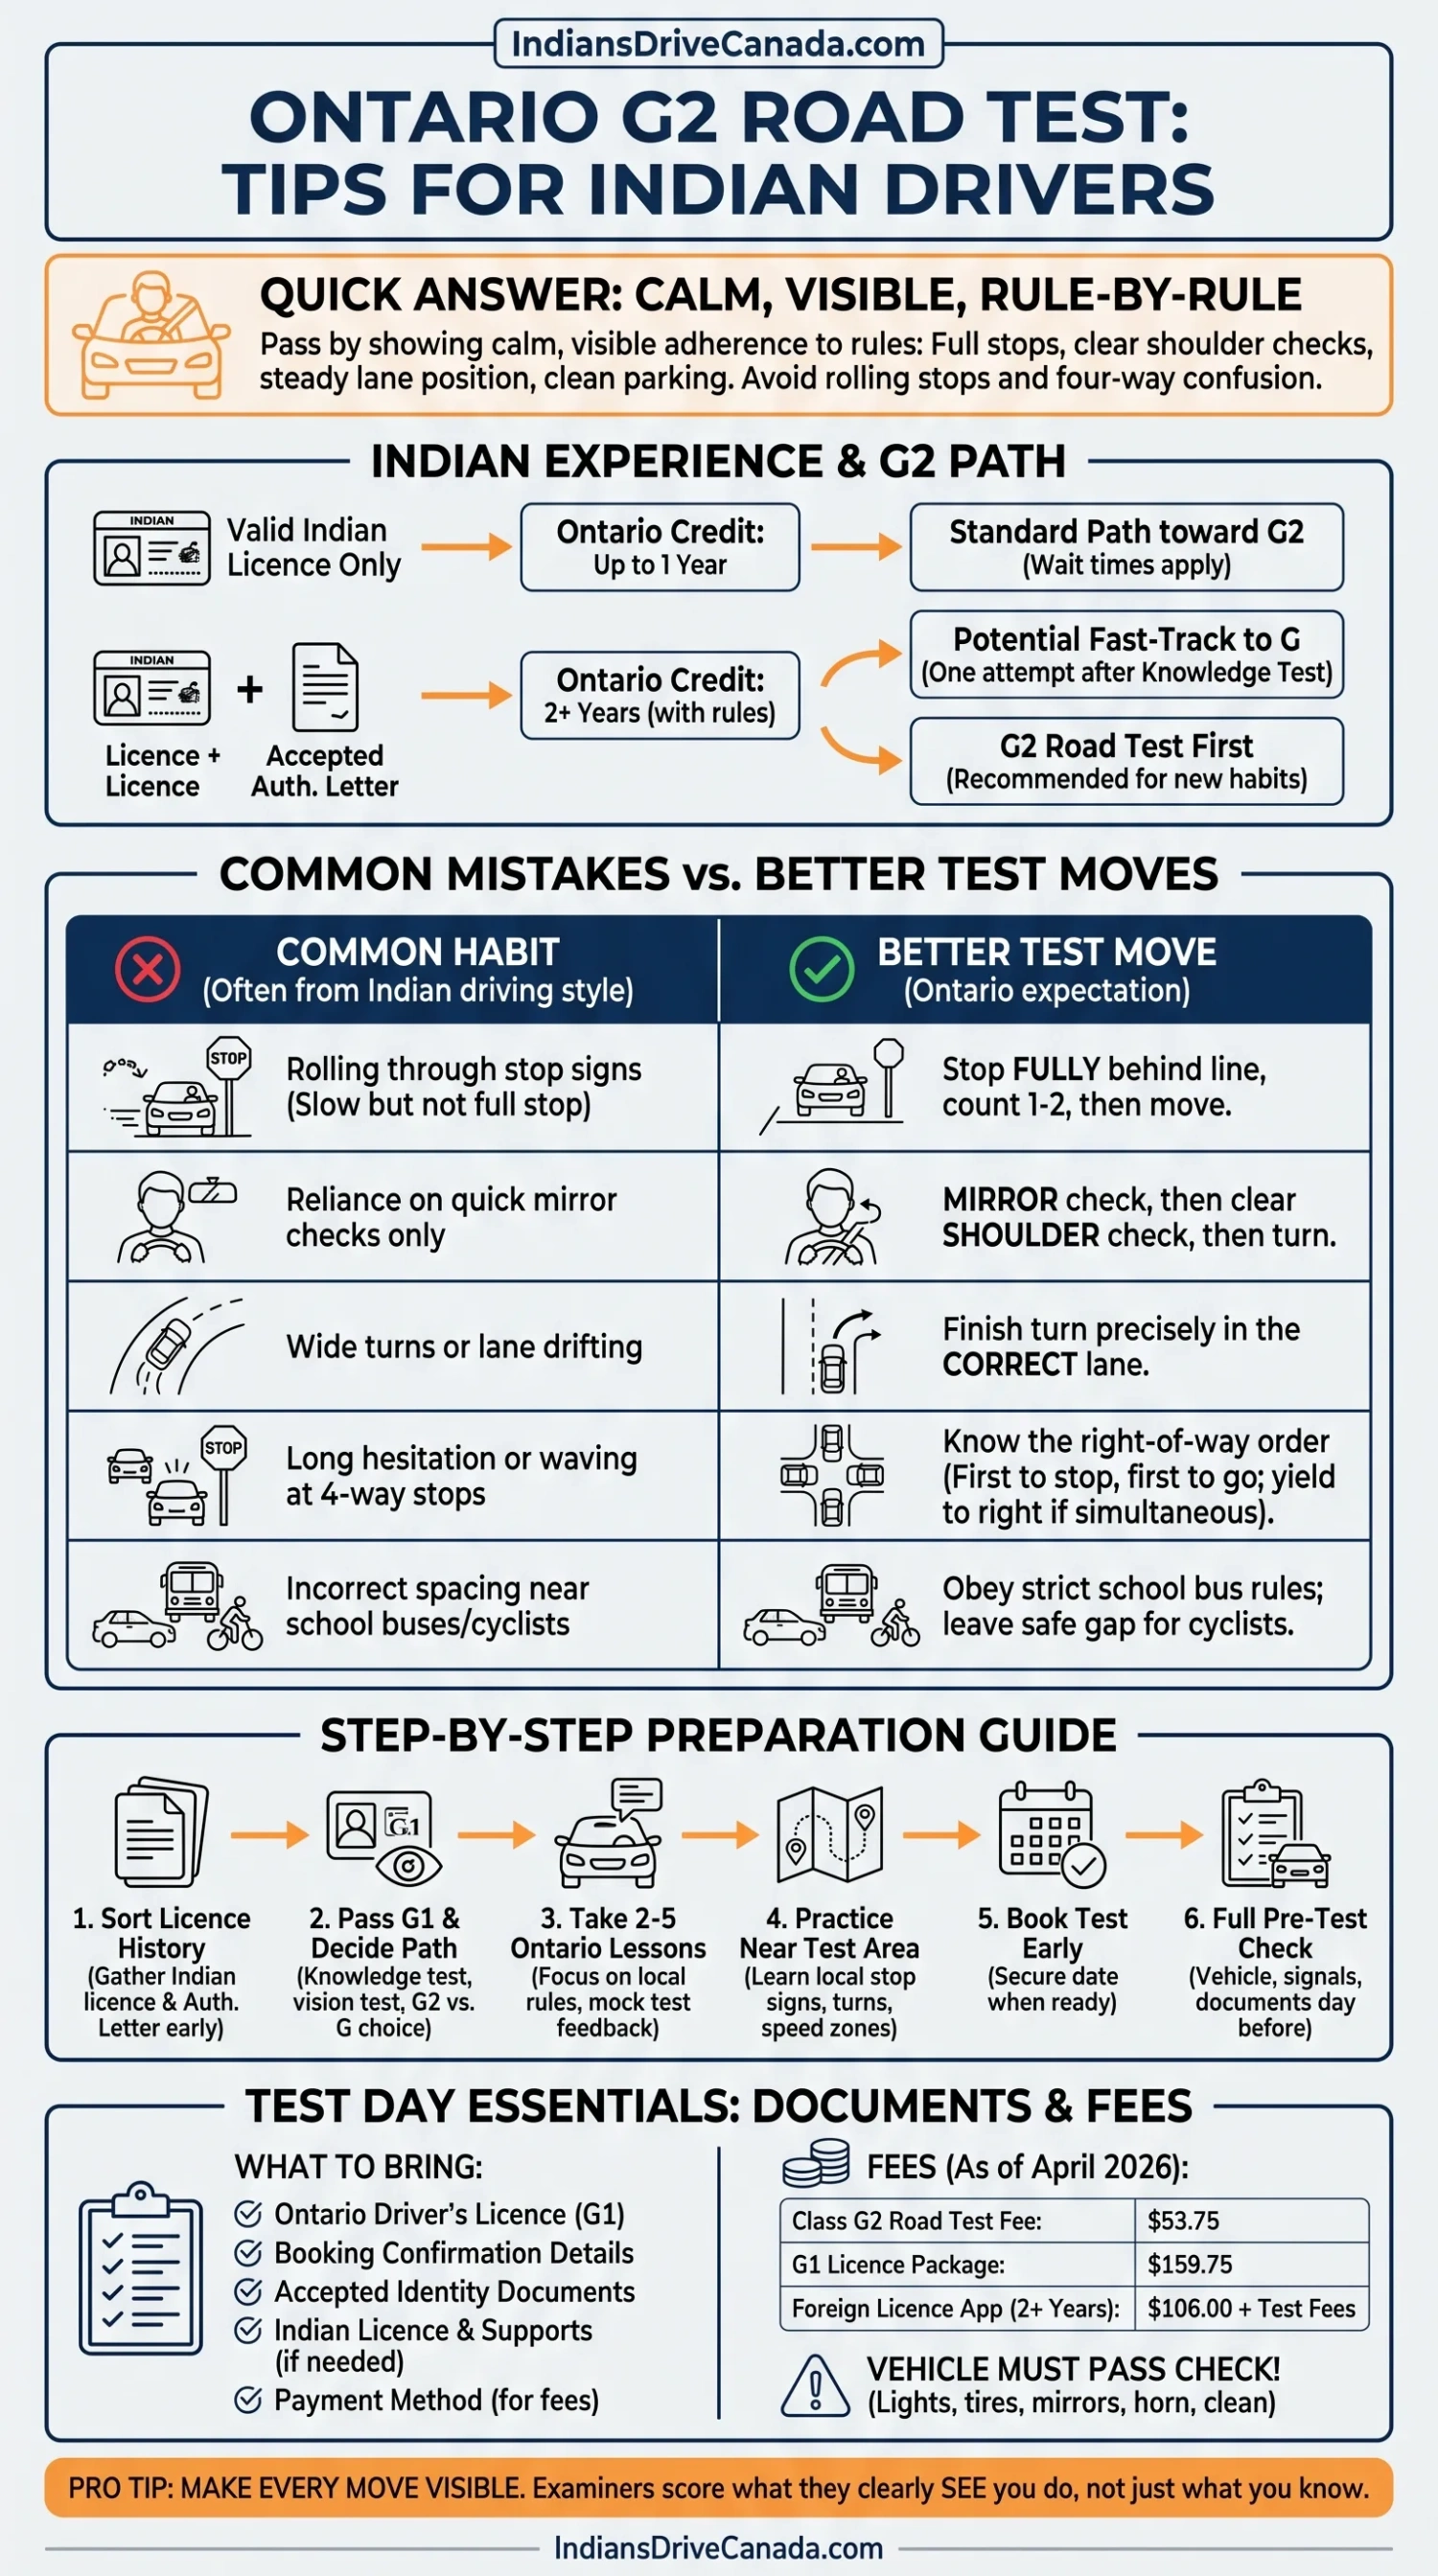
Preparing for the Ontario G2 road test can feel unfamiliar even when you have driven for years in India. The difficulty is not usually basic vehicle control. It is showing Ontario-style observation, right-of-way decisions, lane positioning and speed control consistently while an examiner records each driving task.
India and Ontario use opposite sides of the road, and most vehicles place the steering wheel on opposite sides. Experienced drivers may therefore need to retrain automatic movements during turns, blind-spot checks and parking. The aim is not to erase previous experience. It is to adapt that experience to Ontario’s traffic rules and road-test expectations.
Confirm that you are preparing for the G2 test
The names used for Ontario road tests are often confused. The G2 road test is the first road test taken by a G1 licence holder. DriveTest also calls it the Class G2 road test, while the Ontario driver’s handbook may describe it as the G1 exit test.
This test assesses basic driving skills in normal city conditions and usually takes about 20 minutes. It is different from the later G road test used to obtain full Class G driving privileges.
G2 road test and G road test are not the same
Videos labelled “G test route,” “G2 exit test” or “full G test” may show preparation that does not match your booking.
Ontario changed the foreign-experience rules on July 1, 2026
India is not listed among Ontario’s driver’s licence exchange jurisdictions. From July 1, 2026, a driver from a non-exchange jurisdiction can receive no more than 12 months of verified foreign driving-experience credit.
A qualifying applicant may become eligible to take the G2 road test without serving the normal G1 waiting period. After passing the G2 test, however, the applicant must wait at least 12 months before attempting the G road test. Foreign experience can no longer remove that G2-to-G waiting period.
Older videos and forum posts may describe Indian licence holders going directly to the G road test after presenting more than two years of experience. That route does not reflect the rules in effect from July 1, 2026.
Driving experience from India still needs an Ontario reset
Driving habits vary across India, and no single description applies to every driver. The following adjustments are based on the practical differences between left-side driving in India and right-side driving in Ontario.
| Driving situation | Habit that may carry over | Ontario test behaviour | Useful practice |
|---|---|---|---|
| Road position | Automatic pull toward the left side | Hold a stable position on the right side of the road | Practise on quiet roads with clear lane markings |
| Turning | Entering the side of the road used in India | Finish the turn in the correct Ontario lane | Pause mentally before each turn: “right side after the turn” |
| Vehicle dimensions | Judging the car from a right-hand driving position | Maintain safe curb and centre-line clearance from the left-hand seat | Use parking lines to recalibrate wheel position |
| Observation | Small mirror checks that may not be visible | Use natural but clear head and shoulder movement | Ask an instructor whether each check is visible |
| Intersection priority | Relying on traffic movement or informal communication | Follow stop order, right-of-way rules and pedestrian priority | Repeat all-way-stop exercises from every approach |
| Horn use | Using the horn to announce position | Use the horn only when reasonably needed for safety | Replace routine horn use with earlier scanning and speed adjustment |
The test begins before the vehicle reaches the street
The DriveTest parking area is part of the driving environment. Examiners can observe how you prepare the vehicle, reverse from a space, respond to pedestrians and enter the roadway.
Complete the basic setup before movement begins. Do not adjust mirrors while the vehicle is already rolling or rely on the examiner to remind you.
- Set the seat so you can brake firmly without stretching.
- Adjust the interior and side mirrors.
- Fasten your seat belt and confirm that passengers are secured.
- Locate the parking brake, defroster, lights and windshield-wiper controls.
- Check around the vehicle before reversing or pulling forward.
- Signal before leaving the parking position.
- Check the relevant blind spot before moving into the travel path.
- Observe parking-lot signs, pedestrians and other vehicles.
A backup camera may remain on if it activates automatically, but it cannot replace direct observation. Ontario does not allow applicants to use backup cameras or automated driving aids as substitutes for the skills being tested.
A slow roll is not a complete stop
One of the easiest errors to prevent is failing to stop fully at a stop sign or red light. Reducing speed to walking pace is not enough. The vehicle must stop completely.
Where the vehicle should stop
When a stop line is marked, stop behind it. When there is no stop line, stop before the crosswalk. If neither is present, stop before entering the intersection.
Do not move the front of the vehicle across the stop line just to obtain a better view. First make the required complete stop. If buildings, parked vehicles or vegetation block your view, move forward slowly after the initial stop and check again before entering the intersection.
The observation must continue after stopping
A memorized left-right-left head movement is not enough when it does not match the developing traffic. Check for:
- Pedestrians entering from either side
- Cyclists approaching along the curb or bike lane
- Vehicles that arrived before you
- Vehicles turning across your path
- Drivers who may not stop as expected
Practise the stop as one complete task
Use the same sequence during practice: brake smoothly, stop behind the correct line, scan the intersection, identify who has priority and move only when the path is clear. Avoid counting an artificial number of seconds. A full stop and a sound traffic decision matter more than a memorized countdown.
Mirror checks and shoulder checks have different jobs
Mirrors show only part of the space around a vehicle. A shoulder check is used to view the blind spot that the mirrors do not cover.
Turning your eyes toward a side mirror does not count as checking the blind spot. Before a lateral movement, turn your head far enough to see the area beside and slightly behind the vehicle.
Situations that need a blind-spot check
- Leaving a curb or roadside stop
- Moving out of a parking space
- Changing lanes
- Moving around a parked vehicle or obstruction
- Turning right beside a bicycle lane
- Beginning or completing parts of a three-point turn
- Re-entering traffic after a parking manoeuvre
The movement should be clear enough for the examiner to see, but it should remain controlled. Do not hold your head turned away from the road for too long. Check the mirror, signal, check the blind spot and return your attention to the direction of travel before moving.
Scanning should continue while the vehicle is moving
Some candidates perform a clear shoulder check before leaving the parking area, then focus almost entirely on the road directly ahead. The examiner also needs to see ongoing awareness of:
- Traffic developing behind the vehicle
- Speed-limit and warning signs
- Pedestrians near crossings and driveways
- Vehicles entering from side streets
- Doors that may open from parked cars
- Cyclists approaching from behind before a right turn
Each observation should support a decision. A mirror check may lead you to delay a lane change. A pedestrian near the curb may lead you to reduce speed. A cyclist in the right blind spot means the turn must wait.
Right turns can expose left-side driving habits
A right turn in Ontario is normally completed from the right side of the road into the right lane of the new road, unless pavement markings or signs direct otherwise.
Opening too wide
A candidate may turn into the second lane because the steering input begins late or the vehicle is carried too far away from the curb. This creates a lane-position error and may conflict with another vehicle turning at the same time.
Approach at a controlled speed, keep the vehicle properly positioned before the corner and guide it into the nearest lawful lane. Complete the turn before making any later lane change.
Cutting too close to the curb
The opposite error occurs when the vehicle begins turning too early. The rear wheel may approach or touch the curb. A driver who previously judged curb distance from a right-hand seat may need extra practice judging the passenger side from the left-hand driving position.
Missing cyclists and pedestrians
Before crossing a bike lane or turning beside the curb, check the right mirror and right blind spot. Yield to cyclists and pedestrians whose path crosses the turn.
Do not look only to the left for a gap in vehicle traffic. A safe opening for cars does not mean the crosswalk and bicycle area are clear.
Left turns require lane choice as well as gap selection
For an unprotected left turn, wait until oncoming traffic, pedestrians and cyclists allow the movement to be completed safely. Do not accept a small gap because a vehicle behind you is waiting.
Entering the wrong lane
After turning left, enter the lawful lane indicated by the road markings and intersection design. On a normal two-way road, this is usually the lane immediately to the right of the centre line.
Avoid drifting into a farther lane during the turn. When another lane is needed later, finish the turn first and complete a separate mirror-signal-shoulder-check sequence.
Turning the steering wheel too early
Beginning the turn before the front of the vehicle reaches the correct position can cut across the opposing lane. Keep the wheels straight while waiting for a safe gap. Begin steering only when the turn can be completed without crossing an unsafe path.
Watching vehicles but missing the crosswalk
Continue checking the destination crosswalk while waiting for oncoming traffic. A pedestrian may enter after you first scanned the intersection. Before moving, check the path again rather than relying on the earlier observation.
All-way stops test memory, patience and judgment
At an all-way stop, each driver must stop. The vehicle that arrives first generally proceeds first. When two vehicles arrive at the same time, the driver on the left yields to the driver on the right.
The examiner is not looking for aggressive movement, but excessive hesitation can also disrupt traffic. Once you have the right-of-way and the intersection is clear, proceed smoothly.
Do not treat another driver’s hand signal as a legal command
A driver may wave you through even when another road user has priority. Confirm that all relevant paths are clear before moving. The responsibility for the decision remains with the person operating the vehicle.
Track arrival order before reaching the line
Start observing the intersection while approaching it. Notice which vehicles are already stopped and which are still moving toward their signs. Trying to reconstruct the order only after stopping creates unnecessary hesitation.
A right turn on red is permitted only after the stop
Unless a sign prohibits the movement, Ontario generally allows a right turn while facing a red light. The turn is optional, not mandatory.
Before turning:
- Stop completely at the correct position.
- Check for a sign prohibiting the turn.
- Yield to pedestrians and cyclists.
- Check traffic approaching from the left.
- Check the right blind spot and crossing path.
- Enter only when a safe gap is available.
Do not roll through the red light while looking left. Do not move because the vehicle behind you sounds its horn. Waiting for a safe opportunity is acceptable.
Driving far below the limit can also create a problem
Exceeding the posted limit is unsafe, but driving much slower than conditions require can show weak speed control or uncertainty. The expected speed depends on the posted limit, traffic, visibility, weather and road conditions.
Speed errors that appear during G2 tests
- Continuing at the previous limit after entering a lower-speed area
- Accelerating before the vehicle is fully established after a turn
- Allowing speed to rise on a downhill section
- Driving well below the limit on a clear road without a safety reason
- Watching the speedometer for too long instead of scanning the road
- Following another vehicle without noticing a new speed sign
- Maintaining the posted maximum when rain, snow or poor visibility calls for less speed
Use short speed-awareness exercises
During a lesson, periodically state the last speed sign you saw, your present speed and whether road conditions justify a change. This exercise is for practice sessions, not a requirement to speak continuously during the test.
Hold the lane without crowding the curb
A vehicle can remain between the lane markings and still be poorly positioned. Driving too close to the curb reduces space around parked vehicles and cyclists. Driving too close to the centre line creates risk from opposing traffic.
Look farther ahead rather than staring at the edge of the hood. A longer view helps maintain a smoother path through straight roads and gentle curves.
Parked vehicles need extra space
Watch for occupants, brake lights, front wheels turning outward and doors that may open. Do not make a sudden movement around a parked vehicle. Check the mirrors and blind spot before changing your road position.
Do not move toward the curb when an oncoming vehicle appears
Some drivers react to an approaching bus or truck by steering sharply right. Reduce speed when needed, hold a predictable path and maintain safe clearance from both sides.
Leave usable space behind the vehicle ahead
Following distance should give enough time to respond if traffic stops. Increase the space in rain, snow, darkness or poor visibility. At a traffic light, avoid stopping so close that the rear of the vehicle ahead fills your view.
Parking is an observation task, not only a steering task
The examiner may ask for basic manoeuvres such as parallel parking, a roadside stop or a three-point turn. The exact order and location can vary. Prepare for the skills rather than expecting a fixed route sequence.
Parallel parking
A memorized steering formula can help, but it must be adjusted for the vehicle, parking space and road shape. Throughout the manoeuvre:
- Check the surrounding traffic before stopping beside the parked vehicle.
- Signal before positioning for the manoeuvre.
- Reverse at a slow, controlled speed.
- Look through the rear window and around both sides of the vehicle.
- Check for traffic before the front of the vehicle swings outward.
- Make a safe correction when needed rather than forcing a poor angle.
- Finish reasonably close and parallel to the curb without touching it.
Do not stare at the backup camera or side mirror throughout the manoeuvre. Direct observation remains necessary.
Roadside stop
Check the mirror, signal and blind spot before moving toward the curb. Stop in a lawful position without blocking a driveway, crosswalk or intersection. Secure the vehicle as instructed.
Before returning to traffic, signal, check the mirrors, perform the blind-spot check and wait for a safe gap. Moving away from the curb without a shoulder check is a frequent preventable error.
Three-point turn
The task is not three steering movements completed as quickly as possible. It is a controlled change of direction using forward and reverse movements.
Check traffic before every movement. Look in the direction the vehicle is travelling and continue monitoring both sides. Stop before the curb rather than relying on a last-second brake application.
Examiner instructions should not cause an unsafe manoeuvre
Listen to the entire instruction before acting. A direction such as “turn right at the next intersection” gives time to prepare; it does not require an immediate turn into a driveway or side entrance.
When an instruction is unclear, ask for a brief repetition:
- “Could you please repeat the instruction?”
- “Do you mean this intersection or the next one?”
If you cannot complete a requested turn safely from your current lane, continue safely rather than cutting across traffic. The examiner can redirect the route.
Do not assume the test has been failed because the examiner writes on the score sheet. Examiners record driving tasks throughout the test. Keep applying the rules instead of trying to interpret facial expressions or notes.
Route videos are useful only for local road awareness
A current route video may introduce the area around a DriveTest Centre, including unusual intersections, lane changes, school zones or speed-limit transitions. It cannot guarantee the route used during your appointment.
Route memorization becomes risky when the candidate:
- Looks for a remembered landmark instead of reading traffic signs
- Changes lanes because the video did so, even when current traffic makes it unsafe
- Expects a manoeuvre at a particular location
- Panics when the examiner chooses a different street
- Uses an old video that does not show current signs or road construction
- Studies a G-test route while preparing for the G2 test
Practise the area if it helps you become comfortable, but include unfamiliar roads in your preparation. A road-test-ready driver should respond to the road that is present, not the route remembered from a screen.
Build practice sessions around repeated errors
Long drives do not automatically fix a habit. Short sessions with one measurable objective are often more useful.
Right-side road positioning
Use quiet residential roads to practise right and left turns. After every turn, check whether the vehicle entered the correct lane and settled near the centre of that lane.
Stop-line discipline
Repeat stop-controlled intersections with different visibility conditions. Separate the full stop from any later movement needed to improve the view.
Visible observation
Practise leaving curbs, changing lanes and turning beside bike lanes. Ask the accompanying driver to record only missed mirror or blind-spot checks.
Low-speed manoeuvres
Rotate between parallel parking, roadside stops and three-point turns. Repeat the full observation routine instead of focusing only on the final vehicle position.
Silent mock test
Have an eligible accompanying driver or instructor give directions without coaching. Complete the drive on roads you have not memorized, then review repeated behaviours afterward.
Use a readiness check instead of guessing
Rate each statement as consistent, sometimes inconsistent or not yet comfortable. Any behaviour in the last two groups should become a practice-session objective.
- I stop fully behind the correct line without being reminded.
- I identify the arrival order at all-way stops.
- I check the correct blind spot before every lateral movement.
- I finish right and left turns in the correct lane.
- I notice speed-limit changes without following the car ahead blindly.
- I maintain a stable lane position from the left-hand driving seat.
- I look for cyclists before crossing a bike lane.
- I continue checking pedestrians while waiting to turn.
- I can parallel park without relying on the backup camera.
- I perform a three-point turn with a fresh traffic check before each movement.
- I understand instructions without rushing into the manoeuvre.
- I continue driving calmly after a small error.
- I can drive safely on a route I have not memorized.
This check cannot predict a test result. It identifies behaviours that still depend on prompting, luck or a familiar route.
Prepare the test vehicle the day before
The G2 test is completed in a suitable Class G vehicle provided for the appointment. Before the drive, the examiner performs a basic vehicle check. A test can be declared out-of-order when the vehicle does not meet DriveTest requirements.
Practical vehicle pre-check
- Brake lights and turn signals operate properly.
- Headlights, horn and windshield wipers work.
- The windshield provides a clear view.
- Mirrors are present, secure and usable.
- Seat belts work for the driver and examiner.
- Doors open and close properly.
- Tires appear properly inflated and safe.
- Licence plates are present and readable.
- The parking brake can be applied and released.
- Fuel or battery charge is sufficient for the appointment.
- Snow, ice and condensation can be cleared from the windows.
- Loose items cannot move around the passenger area.
DriveTest publishes the vehicle conditions that can prevent a test from proceeding. Check that page before using a borrowed, rented or driving-school vehicle.
Do not depend on electronic driving aids
Ontario states that automatic parallel-parking systems, lane-monitoring systems, cruise control and backup cameras may not be used to demonstrate road-test skills. Practise operating the vehicle through direct observation, mirror use and normal steering control.
Before the appointment, learn how to disable optional automated features when the vehicle allows it. Do not experiment with unfamiliar controls after the examiner enters the car.
A calm test-day sequence
Before leaving home
- Bring the required driver’s licence and booking information.
- Bring glasses or contact lenses when required by your licence condition.
- Check the vehicle and remove snow, ice or condensation.
- Allow extra travel time for traffic, parking and check-in.
At the DriveTest Centre
- Ontario advises arriving at least 30 minutes before the appointment.
- Park in the designated road-test area when instructed.
- Turn off or silence the phone.
- Adjust the seat and mirrors before movement.
- Listen carefully during the vehicle check and examiner briefing.
During the test
- Follow road signs and present traffic conditions rather than a memorized route.
- Keep scanning after each manoeuvre is completed.
- Do not rush because another driver is waiting.
- Ask for an instruction to be repeated when needed.
- Choose a safe action over a last-second turn.
- Continue driving normally after a minor error.
After returning
- Park only where the examiner directs.
- Secure the vehicle before discussing the result.
- Listen to the feedback without debating the route or traffic.
- Use the score sheet to identify repeated behaviours before another lesson or retest.
Ontario pages to verify before your appointment
Information checked against Ontario and DriveTest material on July 27, 2026. Use the following pages for the part of the process named beside each link: